Friday 15 September 2017

Different types of SnackBar in Android Studio

About Example:- Here is the basic example that "How to Show different Types of Snackbar  in Android Application By Coding"

Basic Requirement:-
1. MainActivity.java  | activity_main.xml
Steps are:-

Step 1:Add a new project and open build.gradle and add one line inside dependencies:-

dependencies {
    compile fileTree(dir: 'libs', include: ['*.jar'])
    androidTestCompile('com.android.support.test.espresso:espresso-core:2.2.2', {
   // CardView       compile 'com.android.support:cardview-v7:26+'
        compile 'com.android.support:design:26.+'    }) 
}

Step 2:  Open activity_main.xml and write following code:-


<?xml version="1.0" encoding="utf-8"?>
<LinearLayout xmlns:android="http://schemas.android.com/apk/res/android"
    xmlns:app="http://schemas.android.com/apk/res-auto"
    xmlns:tools="http://schemas.android.com/tools"
    android:layout_width="match_parent"
    android:layout_height="match_parent"
    android:orientation="vertical"
    android:gravity="center"
    tools:context="com.example.supriyabharti.snackbarexample.MainActivity">
<android.support.v7.widget.CardView
    android:layout_width="match_parent"
    android:layout_height="240dp"
    android:layout_margin="40dp"
    android:elevation="3dp"
    app:cardCornerRadius="4dp"
    android:layout_gravity="center">
    <LinearLayout
        android:layout_width="match_parent"
        android:layout_height="match_parent"
        android:orientation="vertical"
        android:gravity="center">
        <Button
            android:id="@+id/simpleSank"
            android:layout_width="wrap_content"
            android:layout_height="wrap_content"
            android:layout_gravity="center"
            android:text="Simple Snackbar View"/>
        <Button
            android:id="@+id/actionSank"
            android:layout_width="wrap_content"
            android:layout_height="wrap_content"
            android:layout_gravity="center"
            android:text="Action Callback Snackbar"/>
        <Button
            android:id="@+id/customSank"
            android:layout_width="wrap_content"
            android:layout_height="wrap_content"
            android:layout_gravity="center"
            android:text="Simple Snackbar View"/>
    </LinearLayout>
</android.support.v7.widget.CardView>
</LinearLayout>

Step 3:Open MainActivity.java and do the following coding:-

package com.example.supriyabharti.snackbarexample;

import android.graphics.Color;
import android.support.design.widget.Snackbar;
import android.support.v7.app.AppCompatActivity;
import android.os.Bundle;
import android.view.View;
import android.widget.Button;
import android.widget.TextView;

public class MainActivity extends AppCompatActivity {
    Button btnSimple,actionSnackar,customSnackbar;

    @Override   
 protected void onCreate(Bundle savedInstanceState) {
        super.onCreate(savedInstanceState);
        setContentView(R.layout.activity_main);
        btnSimple=(Button)findViewById(R.id.simpleSank);
        actionSnackar=(Button)findViewById(R.id.actionSank);
        customSnackbar=(Button)findViewById(R.id.customSank);

        //listner on button...     
   btnSimple.setOnClickListener(new View.OnClickListener() {
            @Override        
    public void onClick(View view) {
                Snackbar simpleSnackbar=Snackbar.make(view,"Please check your Internet connection!!",Snackbar.LENGTH_SHORT);
                simpleSnackbar.show();
            }
        });

        //action callback....     
   actionSnackar.setOnClickListener(new View.OnClickListener() {
            @Override           
 public void onClick(View view) {
                Snackbar actionSnack=Snackbar.make(view,"Service Unavailable",Snackbar.LENGTH_LONG)
                        .setAction("Retry", new View.OnClickListener() {
                            @Override  
                          public void onClick(View view) {
                            Snackbar snackbar1=Snackbar.make(view,"Connected Successfully",Snackbar.LENGTH_LONG);
                                snackbar1.show();
                            }
                        });
                actionSnack.show();
            }
        });

        //custom snackbar....       
        customSnackbar.setOnClickListener(new View.OnClickListener() {
        @Override        
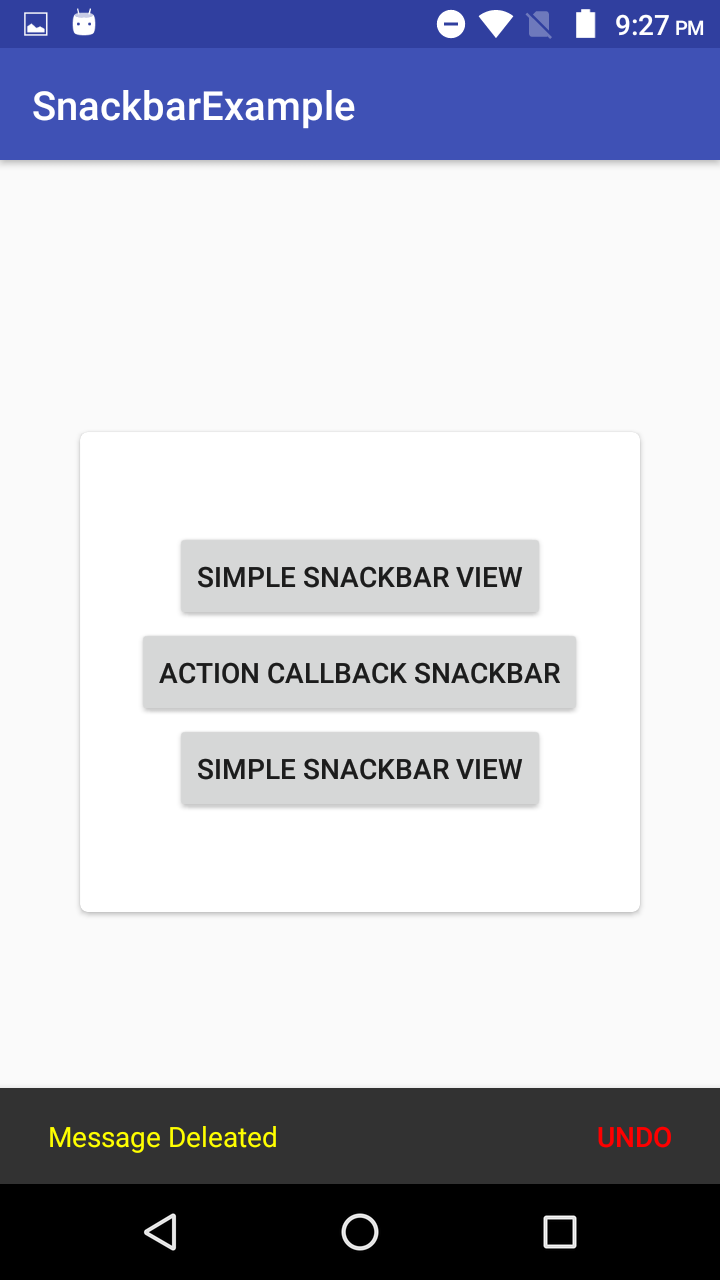
        public void onClick(View view) {
        Snackbar customSnackbar=Snackbar.make(view,"Message Deleated",Snackbar.LENGTH_LONG).setAction("UNDO", new View.OnClickListener() {
        @Override            
        public void onClick(View view) {
                        Snackbar snackbar2=Snackbar.make(view,"Message Stored",Snackbar.LENGTH_LONG);
                        snackbar2.show();
                    }
                });
                customSnackbar.setActionTextColor(Color.RED);
                //change snackbar message color.....      
          View sView=customSnackbar.getView();
                TextView tv=(TextView)sView.findViewById(android.support.design.R.id.snackbar_text);
                tv.setTextColor(Color.YELLOW);
                customSnackbar.show();

            }
        });

    }
}

Step 3:- Output will be like:-

Simple Snackbar View
Action callback Sbackbar
Custom design of Snackbar

Thursday 14 September 2017

Different Type of Date Format in Android | Show Date Picker in EditBox

About Example:- Here is the basic example that "How to Show different Types of Date Format  in Android Application By Coding"

Basic Requirement:-
1. MainActivity.java  | activity_main.xml
Steps are:-

Step 1:Add a new project and open build.gradle and add one line inside dependencies:-

dependencies {
    compile fileTree(dir: 'libs', include: ['*.jar'])
    androidTestCompile('com.android.support.test.espresso:espresso-core:2.2.2', {
        compile 'com.android.support:design:26.+'    }) 
}

Step 2:  Open activity_main.xml and write following code:-


<?xml version="1.0" encoding="utf-8"?>
<LinearLayout xmlns:android="http://schemas.android.com/apk/res/android"
    xmlns:app="http://schemas.android.com/apk/res-auto"
    xmlns:tools="http://schemas.android.com/tools"
    android:layout_width="match_parent"
    android:id="@+id/layout"
    android:layout_height="match_parent"
    android:gravity="center"
    android:orientation="vertical"
    tools:context="com.example.supriyabharti.calendarexample.MainActivity">
    <TextView
        android:id="@+id/tv_currentDate"
        android:layout_width="wrap_content"
        android:layout_height="wrap_content"
        android:text="14 October 2017" />
    <TextView
        android:layout_width="wrap_content"
        android:layout_height="wrap_content"
        android:id="@+id/dFormat2"/>
    <TextView
        android:layout_width="wrap_content"
        android:layout_height="wrap_content"
        android:id="@+id/dFormat3"/>
    <TextView
        android:layout_width="wrap_content"
        android:layout_height="wrap_content"
        android:id="@+id/dFormat4"/>
    <TextView
        android:layout_width="wrap_content"
        android:layout_height="wrap_content"
        android:id="@+id/dFormat5"/>
    <EditText
        android:layout_width="match_parent"
        android:layout_height="wrap_content"
        android:id="@+id/editName"
        android:layout_margin="30dp"
        android:singleLine="true"
        android:hint="Name"/>
    <EditText
        android:layout_width="match_parent"
        android:layout_height="wrap_content"
        android:id="@+id/edit_date"
        android:layout_margin="30dp"
        android:singleLine="true"
        android:clickable="true"
        android:editable="false"
        android:hint="Birthday"/>
    <Button
        android:layout_width="match_parent"
        android:layout_height="wrap_content"
        android:id="@+id/btnSubmit"
        android:text="Submit"
        android:layout_margin="30dp"/>
</LinearLayout>

Step 3:Open MainActivity.java and write following code:-

package com.example.supriyabharti.calendarexample;

import java.text.SimpleDateFormat;
import android.app.DatePickerDialog;
import android.support.design.widget.Snackbar;
import android.support.v7.app.AppCompatActivity;
import android.os.Bundle;
import android.view.View;
import android.widget.Button;
import android.widget.DatePicker;
import android.widget.EditText;
import android.widget.TextView;
import java.util.Calendar;

public class MainActivity extends AppCompatActivity {
    EditText edtDate,edtName;
    TextView tvCurrentdate,dFormat2,dFormat3,dFormat4,dFormat5;
    Button btnSubmit;
     Calendar c;

    @Override    protected void onCreate(Bundle savedInstanceState) {
        super.onCreate(savedInstanceState);
        setContentView(R.layout.activity_main);
        edtName=(EditText)findViewById(R.id.editName);
        edtDate=(EditText)findViewById(R.id.edit_date);
        tvCurrentdate=(TextView)findViewById(R.id.tv_currentDate);
        dFormat2=(TextView)findViewById(R.id.dFormat2);
        dFormat3=(TextView)findViewById(R.id.dFormat3);
        dFormat4=(TextView)findViewById(R.id.dFormat4);
        dFormat5=(TextView)findViewById(R.id.dFormat5);
        btnSubmit=(Button)findViewById(R.id.btnSubmit);
         c=Calendar.getInstance();
        SimpleDateFormat sf1=new SimpleDateFormat("dd-MM-yyyy HH:mm:ss"); //14-09-2017       
        String dateFormat1= sf1.format(c.getTime());
        tvCurrentdate.setText(dateFormat1);

        SimpleDateFormat sf2=new SimpleDateFormat("dd MMMM yyyy"); //14 September 2017        
        String dateFormat2= sf2.format(c.getTime());
        dFormat2.setText(dateFormat2);

        SimpleDateFormat sf3=new SimpleDateFormat("dd.MM.yyyy");  //14.09.2017        
        String dateFormat3=sf3.format(c.getTime());
        dFormat3.setText(dateFormat3);

        SimpleDateFormat sf4=new SimpleDateFormat("dd/MM/yyyy");  //14/09/2017        
        String dateFormat4=sf4.format(c.getTime());
        dFormat4.setText(dateFormat4);

        SimpleDateFormat sf5=new SimpleDateFormat("dd MMM yyyy"); //14 sept 2017        
        String dateFormat5=sf5.format(c.getTime());
        dFormat5.setText(dateFormat5);
        tvCurrentdate.setText(dateFormat1);
        final DatePickerDialog.OnDateSetListener  datePickerDialog=new DatePickerDialog.OnDateSetListener() {
            @Override           
            public void onDateSet(DatePicker datePicker, int i, int i1, int i2) {
                c.set(Calendar.DAY_OF_MONTH,i2);
                c.set(Calendar.MONTH,i1);
                c.set(Calendar.YEAR,i);
                updateLavel();

            }
        };
        edtDate.setOnClickListener(new View.OnClickListener() {
            @Override            
            public void onClick(View view) {
            new DatePickerDialog(MainActivity.this,datePickerDialog,c.get(Calendar.YEAR),c.get(Calendar.MONTH),c.get(Calendar.DAY_OF_MONTH)).show();

            }
        });
        btnSubmit.setOnClickListener(new View.OnClickListener() {
            @Override           
             public void onClick(View view) {
                if(edtName.getText().toString().equalsIgnoreCase("") || edtDate.getText().toString().equalsIgnoreCase("")){
                    Snackbar snackbar=Snackbar.make(view,"Please fill All Field.!!",Snackbar.LENGTH_LONG);
                    snackbar.show();
                }else {
                    Snackbar snackbar=Snackbar.make(view,"Submit Successfully",Snackbar.LENGTH_LONG);
                    snackbar.show();
                    edtName.setText("");
                    edtDate.setText("");
                }
            }
        });


    }
    //method...    public void updateLavel(){
        SimpleDateFormat dateFormat1=new SimpleDateFormat("dd MMM yyyy");
        edtDate.setText(dateFormat1.format(c.getTime()));
    }

}

Step 4:Output are:-


Tuesday 12 September 2017

Adding TabsLayout (Tabs) | With Text and Icon in Android Studio

About Example:- Here is the basic example that "How to Add TabsLayout   in Android Application By Coding"

Basic Requirement:-
1. MainActivity.java  | activity_main.xml
Steps are:-

Step 1: Add a new project and open activity_main.xml and write following code:-<?xml version="1.0" encoding="utf-8"?><LinearLayout xmlns:android="http://schemas.android.com/apk/res/android" xmlns:app="http://schemas.android.com/apk/res-auto" 

android:orientation="vertical"

android:layout_width="match_parent" 

android:layout_height="match_parent">

    <android.support.design.widget.TabLayout 
    android:id="@+id/tabsLayout1"    
    android:layout_width="match_parent"
    android:layout_height="wrap_content" 
    app:tabMode="fixed"       
    app:tabGravity="fill">
</android.support.design.widget.TabLayout>
<android.support.v4.view.ViewPager   
 android:id="@+id/viewPager1"   
 android:layout_width="match_parent"  
 android:layout_height="match_parent">
</android.support.v4.view.ViewPager>
</LinearLayout>


Step 2: Add some Fragment classes as much as u needs to show in tabs, here i am adding 3 classe:- Right click on your package and add new java class:-

 A). GameFragment.java | SongFragment.java | MovieFragment.java

B) In every class code will be like following:-

public class GameFragment extends android.support.v4.app.Fragment {
    public static final String ARG_OBJECT = "object";
    @Nullable    
@Override    
public View onCreateView(LayoutInflater inflater, @Nullable ViewGroup container, Bundle savedInstanceState) {
        View v=inflater.inflate(R.layout.gamefargment,container,false);
        Bundle args=getArguments();
        TextView tv=(TextView)v.findViewById(R.id.tvgame);
        tv.setOnClickListener(new View.OnClickListener() {
            @Override            public void onClick(View view) {
                Toast.makeText(getActivity(),"Click 1",Toast.LENGTH_LONG).show();
            }
        });
        
        return v;
    }
}

C) gamefragment.xml will be like following:-

<?xml version="1.0" encoding="utf-8"?>
<LinearLayout xmlns:android="http://schemas.android.com/apk/res/android"   
 android:orientation="vertical" 
android:layout_width="match_parent"    
android:layout_height="match_parent"  
  android:background="#DAF7A6"   
 android:gravity="center">
    <TextView        
android:id="@+id/tvgame"  
      android:layout_width="match_parent"       
 android:layout_height="wrap_content"      
  android:text="Game"      
  android:textSize="30sp"      
  android:gravity="center"/>


</LinearLayout>

Step 3:  Open MainActivity  and write following code:-

public class MainActivity extends AppCompatActivity{


    ViewPager viewPager;
    TabLayout tabLayout;
    int[] iconList={R.drawable.game,R.drawable.song,R.drawable.mov};
    @Override    
protected void onCreate(@Nullable Bundle savedInstanceState) {
        super.onCreate(savedInstanceState);
        setContentView(R.layout.activity_main);
        tabLayout=(TabLayout)findViewById(R.id.tablaout3);
        viewPager=(ViewPager)findViewById(R.id.viewPager3);
        tabLayout.setupWithViewPager(viewPager);
        setViewAdapter4(viewPager);
        setIcon();

    }

    //set class to releted tabs....    public void setViewAdapter4(ViewPager vp){
        ViewPagerAdapterClasss3 adapter=new ViewPagerAdapterClasss3(getSupportFragmentManager());
        adapter.addFragment(new GameFragment(),"Game");
        adapter.addFragment(new SongFragment(),"Song");
        adapter.addFragment(new MovieFragment(),"Movie");
        vp.setAdapter(adapter);

    }
    //set icon method start..    public void setIcon(){
        tabLayout.getTabAt(0).setIcon(iconList[0]);
        tabLayout.getTabAt(1).setIcon(iconList[1]);
        tabLayout.getTabAt(2).setIcon(iconList[2]);
    }
}
class ViewPagerAdapterClasss3 extends FragmentPagerAdapter {
    final List<Fragment> mFragmentAdd4=new ArrayList<>();
    final List<String> mTitel4=new ArrayList<>();
    @Override   
 public Fragment getItem(int position) {
        return mFragmentAdd4.get(position);
    }

    @Override   
 public int getCount() {
        return mFragmentAdd4.size();
    }

    @Override    
public CharSequence getPageTitle(int position) {
        return mTitel4.get(position);
    }
    public void addFragment(Fragment fragment,String titel){
        mFragmentAdd4.add(fragment);
        mTitel4.add(titel);

    }

    public ViewPagerAdapterClasss3(FragmentManager fm) {
        super(fm);
    }
}

Step 4: Open build.gradle and add following:-

dependencies {
    compile fileTree(dir: 'libs', include: ['*.jar'])
    androidTestCompile('com.android.support.test.espresso:espresso-core:2.2.2', {
        exclude group: 'com.android.support', module: 'support-annotations'    })
    compile 'com.android.support:appcompat-v7:26.+'    compile 'com.android.support:design:26.+'
    
}

Step 1: Output will be like:-


Wednesday 6 September 2017

Change SatusBar color and ActionBar color in Android

About Example:- Here is the basic example that "How to Change StatusBarColor and ActionBarColor   in Android Application By using Coding"

Basic Requirement:-
1. MainActivity.java  | activity_main.xml
Steps are:-
Step 1: Add a new project and open activity_main.xml and write following code:-
<?xml version="1.0" encoding="utf-8"?>
<android.support.constraint.ConstraintLayout 
 xmlns:android="http://schemas.android.com/apk/res/android"   
 xmlns:app="http://schemas.android.com/apk/res-auto"   
 xmlns:tools="http://schemas.android.com/tools"    
 android:layout_width="match_parent"   
 android:layout_height="match_parent"   
 tools:context="com.example.supriyabharti.changestatusbarcolor.MainActivity">

    <TextView
     android:layout_width="wrap_content"    
     android:layout_height="wrap_content"       
     android:text="Hello World!"     
     app:layout_constraintBottom_toBottomOf="parent"       
     app:layout_constraintLeft_toLeftOf="parent"       
     app:layout_constraintRight_toRightOf="parent"    
     app:layout_constraintTop_toTopOf="parent" />

</android.support.constraint.ConstraintLayout>

Step 2:- MainActivity.java

import android.os.Bundle;
import android.view.Window;
import android.view.WindowManager;

public class MainActivity extends AppCompatActivity {

    @Override    
        protected void onCreate(Bundle savedInstanceState) {
        super.onCreate(savedInstanceState);
        setContentView(R.layout.activity_main);

        //code for changing ActionBar color of an activity       
       getSupportActionBar().setBackgroundDrawable(new ColorDrawable(getResources().getColor(R.color.colorAccent)));

        //code for to change statusbar color of an activity.....        
        if (Build.VERSION.SDK_INT >= Build.VERSION_CODES.LOLLIPOP) {
            Window window = getWindow();
            window.addFlags(WindowManager.LayoutParams.FLAG_DRAWS_SYSTEM_BAR_BACKGROUNDS);
            window.setStatusBarColor(Color.RED);
        }
    }
}

Output:-

Show Notification in Android

About Example:- Here is the basic example that "How to Show Notification   in Android Application By using Coding"

Basic Requirement:-
1. MainActivity.java  | activity_main.xml
Steps are:-
Step 1: Add a new project and open activity_main.xml and write following code:-
<?xml version="1.0" encoding="utf-8"?>
<LinearLayout xmlns:android="http://schemas.android.com/apk/res/android"    
 xmlns:tools="http://schemas.android.com/tools"   
 android:layout_width="match_parent" 
 android:layout_height="match_parent"    
 android:orientation="vertical"   
 android:gravity="center"    
 tools:context="com.example.supriyabharti.notificationexamp.MainActivity">

 <Button        
 android:id="@+id/btnShow"        
 android:layout_width="wrap_content"        
 android:layout_height="wrap_content"       
 android:layout_gravity="center"      
 android:text="Show Notification"/>
 <Button        
 android:id="@+id/btnCancel"       
 android:layout_width="wrap_content"      
 android:layout_height="wrap_content"      
 android:layout_gravity="center"        
 android:text="Cancel Notification"/>
</LinearLayout>


Step 2:- Open MainActivity.java class and write code like following:-

package com.example.supriyabharti.notificationexamp;    
import android.support.v7.app.NotificationCompat;
import android.view.View;
import android.widget.Button;

public class MainActivity extends AppCompatActivity {
    Button btnShow,btnCancel;
        protected void onCreate(Bundle savedInstanceState) {
        super.onCreate(savedInstanceState);
        setContentView(R.layout.activity_main);
        btnShow=(Button)findViewById(R.id.btnShow);
        btnCancel=(Button)findViewById(R.id.btnCancel);
        btnShow.setOnClickListener(new View.OnClickListener() {   
      public void onClick(View view) {
                showNotification();
            }
        });
        btnCancel.setOnClickListener(new View.OnClickListener() {
            @Override    
        public void onClick(View view) {
                cancelNotification();
            }
        });
    }
    public void showNotification(){
        NotificationCompat.Builder builder=new NotificationCompat.Builder(this);
        builder.setSmallIcon(R.drawable.logotic);
        Intent i=new Intent(Intent.ACTION_VIEW, Uri.parse("http://androidhubb.blogspot.in/"));
        PendingIntent pendingIntent=PendingIntent.getActivity(this,0,i,0);
        builder.setContentIntent(pendingIntent);
        builder.setLargeIcon(BitmapFactory.decodeResource(getResources(),R.drawable.icon));
        builder.setContentTitle("Android Important News");
        builder.setContentText("Android hubb is a blog..");
        builder.setSubText("supriya");
        NotificationManager notificationManager=(NotificationManager)getSystemService(NOTIFICATION_SERVICE);
        notificationManager.notify(1,builder.build());
    }
    public void cancelNotification(){
        String str= Context.NOTIFICATION_SERVICE;
        NotificationManager notificationManager=(NotificationManager)getSystemService(str);
        notificationManager.cancel(1);
    }
}
Output:-


Tuesday 5 September 2017

SignUp | Login | User's Setting by using SharedPreferences in Android

About Example:- Here is the example that "How to do SignUp | Login and Update user's Profile  in Android Application By using Coding"

Basic Requirement:-
1. MainActivity.java  | activity_main.xml
2.Login |   login.xml
3.Signup | signup.xml
4.UserProfile   |   user_profile.xml
5.UserProfileUpdate   | user_profile_update.xml
6.SharedConstant

Steps are:-
Step 1: Add a new project and open activity_main.xml and write following code:-

<?xml version="1.0" encoding="utf-8"?>
<LinearLayout xmlns:android="http://schemas.android.com/apk/res/android"
        android:layout_width="match_parent"
    android:orientation="vertical"
    android:gravity="center"
    android:layout_height="match_parent"
>

    <TextView
        android:textSize="20sp"
        android:id="@+id/uerName"
        android:layout_width="wrap_content"
        android:layout_height="wrap_content"
        android:layout_gravity="center"
        android:layout_margin="30dp"
        android:text="Welcome"
/>

</LinearLayout>

Steps 2: MainActivity.java

package com.example.supriyabharti.profilesettingexmp;


import android.content.Intent;
import android.content.SharedPreferences;
import android.os.Bundle;
import android.os.Handler;
import android.preference.PreferenceManager;
import android.support.v7.app.AppCompatActivity;

public class MainActivity extends AppCompatActivity {

    SharedConstant sharedConstant;
    @Override   
       protected void onCreate(Bundle savedInstanceState) {
        super.onCreate(savedInstanceState);
        setContentView(R.layout.activity_main);
        sharedConstant=new SharedConstant(MainActivity.this);

        new Handler().postDelayed(new Runnable(){
            public void run(){
                String strUserPhone=sharedConstant.getStringPref("userPhone");
                if(strUserPhone.matches("")){
                    startActivity(new Intent(MainActivity.this,SignUp.class));
                    finish();
                }else {
                    startActivity(new Intent(MainActivity.this, UserProfile.class));
                    finish();
                }
            }

        },3000 );

    }
}

Steps 3: SharedConstant.java
package com.example.supriyabharti.profilesettingexmp;

import android.content.Context;
import android.content.SharedPreferences;
public class SharedConstant  {

    SharedPreferences preferences;
    SharedPreferences.Editor editor;
    public SharedConstant(Context context) {
        preferences=context.getSharedPreferences("MyData", Context.MODE_PRIVATE);
    }

    public  void setPrefString(String key,String value){
        editor=preferences.edit();
        editor.putString(key,value);
        editor.commit();
    }
    public  String getStringPref(String key){
        return preferences.getString(key,"");
    }
}

Steps 4:- SignUp.java
package com.example.supriyabharti.profilesettingexmp;

import android.content.Context;
import android.content.Intent;
import android.content.SharedPreferences;
import android.os.Bundle;
import android.support.v7.app.AppCompatActivity;
import android.view.View;
import android.widget.Button;
import android.widget.EditText;
import android.widget.TextView;
import android.widget.Toast;

/** * Created by supriyabharti on 05/09/17. */
public class SignUp extends AppCompatActivity {
    TextView tvLogin;
    EditText edName,edPhone;
    Button btnSignup;
    @Override    
       Loginprotected void onCreate(@Nullable Bundle savedInstanceState) {
        super.onCreate(savedInstanceState);
        setContentView(R.layout.signup);
        final SharedConstant pref=new SharedConstant(SignUp.this);
        tvLogin=(TextView)findViewById(R.id.login);
        edName=(EditText)findViewById(R.id.userName);
        edPhone=(EditText)findViewById(R.id.userPhone);
        btnSignup=(Button) findViewById(R.id.signUp);

        btnSignup.setOnClickListener(new View.OnClickListener() {
            @Override            public void onClick(View view) {
                if(edName.getText().toString().isEmpty() && edPhone.getText().toString().isEmpty()){
                    Toast.makeText(getApplicationContext(),"Please enter Value",Toast.LENGTH_LONG).show();

                }else{
                    pref.setPrefString("userName",edName.getText().toString());
                    pref.setPrefString("userPhone",edPhone.getText().toString());
                    pref.setPrefString("userLocation","");
                    startActivity(new Intent(SignUp.this,UserProfile.class));
                    finish();
                }
            }
        });

        tvLogin.setOnClickListener(new View.OnClickListener() {
            @Override            public void onClick(View view) {
                startActivity(new Intent(SignUp.this,Login.class));
                finish();
            }
        });
    }
}
Steps 5:- signup.xml


<?xml version="1.0" encoding="utf-8"?> <LinearLayout xmlns:android="http://schemas.android.com/apk/res/android"     android:orientation="vertical"     
android:layout_width="match_parent"     
android:gravity="center"     
android:layout_height="match_parent">     <EditText         
android:id="@+id/userName"        
android:layout_margin="20dp"         
android:layout_width="match_parent"         
android:layout_height="wrap_content"         
android:hint="Name"/>     <EditText         
android:id="@+id/userPhone"         
android:layout_margin="20dp"         
android:layout_width="match_parent"         
android:layout_height="wrap_content"         
android:hint="Phone"/>     <Button         
android:id="@+id/signUp"         
android:layout_width="wrap_content"         
android:layout_height="wrap_content"         
android:text="Signup"/>     <TextView         
android:id="@+id/login"         
android:layout_width="wrap_content"         
android:layout_height="wrap_content"        
android:text="Login"         
android:textSize="20sp"         
android:layout_marginTop="20dp"/> </LinearLayout>
Steps 6:- Login.java
package com.example.supriyabharti.profilesettingexmp;

import android.content.Context;
import android.content.Intent;
import android.content.SharedPreferences;
import android.os.Bundle;
import android.support.annotation.Nullable;
import android.support.v7.app.AppCompatActivity;
import android.view.View;
import android.widget.Button;
import android.widget.EditText;
import android.widget.TextView;
import android.widget.Toast;

/** * Created by supriyabharti on 05/09/17. */
public class Login extends AppCompatActivity {
    TextView tvSignup;
    EditText edPhone;
    Button btnLoginup;
    @Override    protected void onCreate(@Nullable Bundle savedInstanceState) {
        super.onCreate(savedInstanceState);
        setContentView(R.layout.login);
       final SharedConstant sharedConstant=new SharedConstant(Login.this);
        tvSignup=(TextView)findViewById(R.id.userSignup);
        btnLoginup=(Button) findViewById(R.id.userLogin);
        edPhone=(EditText) findViewById(R.id.userPhone);

        btnLoginup.setOnClickListener(new View.OnClickListener() {
            @Override            public void onClick(View view) {
                if(edPhone.getText().toString().matches("")){
                    Toast.makeText(getApplicationContext(),"Please enter value",Toast.LENGTH_LONG).show();

                }else{
                    String str=sharedConstant.getStringPref("userPhone");
                    if(str.equalsIgnoreCase(edPhone.getText().toString())){
                        startActivity(new Intent(Login.this,UserProfile.class));
                        finish();

                    }else {
                        Toast.makeText(getApplicationContext(),"Invalid Login",Toast.LENGTH_LONG).show();
                    }
                }
            }
        });
        tvSignup.setOnClickListener(new View.OnClickListener() {
            @Override            public void onClick(View view) {
                startActivity(new Intent(Login.this,SignUp.class));
                finish();
            }
        });
    }
}

Steps 7:- login.xml


<?xml version="1.0" encoding="utf-8"?> <LinearLayout xmlns:android="http://schemas.android.com/apk/res/android"     android:orientation="vertical"     android:layout_width="match_parent"     android:gravity="center"     android:layout_height="match_parent">     <EditText         android:id="@+id/userPhone"         android:layout_margin="20dp"         android:layout_width="match_parent"         android:layout_height="wrap_content"         android:hint="Phone"/>     <Button         android:id="@+id/userLogin"         android:layout_width="wrap_content"         android:layout_height="wrap_content"         android:text="Login"/>     <TextView         android:id="@+id/userSignup"         android:layout_width="wrap_content"         android:layout_height="wrap_content"         android:text="SignUp"         android:textSize="20sp"         android:layout_marginTop="20dp"/> </LinearLayout>
Steps 8:- UserProfile.java
package com.example.supriyabharti.profilesettingexmp;

import android.content.Context;
import android.content.Intent;
import android.content.SharedPreferences;
import android.os.Bundle;
import android.support.annotation.Nullable;
import android.support.v7.app.AppCompatActivity;
import android.view.View;
import android.widget.Button;
import android.widget.EditText;
import android.widget.TextView;

/** * Created by supriyabharti on 05/09/17. */
public class UserProfile extends AppCompatActivity {
    TextView logout,userName;
    Button viewProfile;
    SharedConstant sharedConstant;
    @Override    protected void onCreate(@Nullable Bundle savedInstanceState) {
        super.onCreate(savedInstanceState);
        setContentView(R.layout.user_profile);
        logout=(TextView)findViewById(R.id.logout);
        userName=(TextView)findViewById(R.id.uerName);
        viewProfile=(Button) findViewById(R.id.viewProfile);
        sharedConstant=new SharedConstant(UserProfile.this);

        String s=sharedConstant.getStringPref("userName");
        userName.setText(s);
        logout.setOnClickListener(new View.OnClickListener() {
            @Override            public void onClick(View view) {
                sharedConstant.setPrefString("userName","");
                sharedConstant.setPrefString("userPhone","");
                startActivity(new Intent(UserProfile.this,SignUp.class));
                finish();
            }
        });

        viewProfile.setOnClickListener(new View.OnClickListener() {
            @Override            public void onClick(View view) {
                startActivity(new Intent(UserProfile.this,UserProfileUpdate.class));

            }
        });
    }
}
Steps 9:-user_profile.xml
<?xml version="1.0" encoding="utf-8"?>
<LinearLayout xmlns:android="http://schemas.android.com/apk/res/android"    
xmlns:app="http://schemas.android.com/apk/res-auto"    
xmlns:tools="http://schemas.android.com/tools"    
android:layout_width="match_parent"    
android:orientation="vertical"    
android:layout_height="match_parent">

    <TextView        
android:id="@+id/uerName"        
android:layout_width="wrap_content"        
android:layout_height="wrap_content"        
android:layout_gravity="center"        
android:layout_margin="30dp"        
android:text="Name"        
android:textSize="25sp"        
android:textStyle="bold"        
android:textColor="#000"/>
    <Button        
android:id="@+id/viewProfile"        
android:layout_width="wrap_content"        
android:layout_height="wrap_content"        
android:text="View Full Profile"        
android:layout_gravity="center"/>
    <TextView        
android:id="@+id/logout"        
android:layout_width="match_parent"        
android:gravity="center"        
android:layout_marginTop="20dp"        
android:layout_height="wrap_content"        
android:text="Logout"/>

</LinearLayout>
Steps 10:- UserProfileUpdate.java
package com.example.supriyabharti.profilesettingexmp;

import android.content.Intent;
import android.os.Bundle;
import android.support.annotation.Nullable;
import android.support.v7.app.AppCompatActivity;
import android.view.View;
import android.widget.Button;
import android.widget.EditText;
import android.widget.TextView;
import android.widget.Toast;

/** * Created by supriyabharti on 05/09/17. */
public class UserProfileUpdate extends AppCompatActivity {
    EditText edPhone,edName,edLocation;
    Button btnEdit,btnSave;
    @Override    
protected void onCreate(@Nullable Bundle savedInstanceState) {
        super.onCreate(savedInstanceState);
        setContentView(R.layout.user_profile_update);
       final SharedConstant sharedConstant=new SharedConstant(UserProfileUpdate.this);
        btnEdit=(Button) findViewById(R.id.userLogin);
        btnSave=(Button) findViewById(R.id.userSave);
        edPhone=(EditText) findViewById(R.id.userPhone);
        btnSave.setVisibility(View.GONE);
        btnEdit.setVisibility(View.VISIBLE);


        edName=(EditText) findViewById(R.id.userName);
        edLocation=(EditText) findViewById(R.id.userLocation);

        edName.setText(sharedConstant.getStringPref("userPhone"));
        edPhone.setText(sharedConstant.getStringPref("userName"));
        edLocation.setText(sharedConstant.getStringPref("userLocation"));

        edName.setEnabled(false);
        edPhone.setEnabled(false);
        edLocation.setEnabled(false);

        btnEdit.setOnClickListener(new View.OnClickListener() {
            @Override            
public void onClick(View view) {

                edName.setEnabled(true);
                edPhone.setEnabled(true);
                edLocation.setEnabled(true);
                btnSave.setVisibility(View.VISIBLE);
                btnEdit.setVisibility(View.GONE);


            }
        });
        btnSave.setOnClickListener(new View.OnClickListener() {
            @Override            
public void onClick(View view) {
                sharedConstant.setPrefString("userName",edName.getText().toString());
                sharedConstant.setPrefString("userPhone",edPhone.getText().toString());
                sharedConstant.setPrefString("userLocation",edLocation.getText().toString());
                edName.setEnabled(false);
                edPhone.setEnabled(false);
                edLocation.setEnabled(false);
                btnSave.setVisibility(View.GONE);
                btnEdit.setVisibility(View.VISIBLE);
            }
        });

    }
}

Steps 11:- user_profile_update.xml
<?xml version="1.0" encoding="utf-8"?>
<LinearLayout xmlns:android="http://schemas.android.com/apk/res/android"  
  android:orientation="vertical"   
 android:layout_width="match_parent"   
 android:layout_height="match_parent">
    <TextView        
android:layout_width="match_parent"       
 android:gravity="center"        
android:layout_marginTop="20dp"        
android:textStyle="bold"        
android:textColor="#000"       
 android:textSize="25sp"       
 android:layout_height="wrap_content"       
 android:text="User Name"/>

    <EditText        
android:id="@+id/userName"        
android:layout_margin="10dp"        
android:layout_width="match_parent"        
android:layout_height="wrap_content"        
android:hint="Name"/>
    <EditText        
android:id="@+id/userPhone"        
android:layout_margin="10dp"        
android:layout_width="match_parent"        
android:layout_height="wrap_content"        
android:hint="Phone"/>
    <EditText        
android:id="@+id/userLocation"        
android:layout_margin="10dp"        
android:layout_width="match_parent"        
android:layout_height="wrap_content"        
android:hint="Location"/>
    <Button        
android:id="@+id/userLogin"        
android:layout_gravity="center"        
android:layout_width="wrap_content"        
android:layout_height="wrap_content"        
android:text="Edit"        
android:visibility="gone"/>
    <Button        
android:id="@+id/userSave"        
android:layout_gravity="center"        
android:layout_width="wrap_content"        
android:layout_height="wrap_content"        
android:text="save"        
android:visibility="gone"/>

</LinearLayout>
OUTPUT:-