Sunday, 31 July 2016

What is Web Services? | Type Of Web Services | Component Of Web Services

What is Web Services?
  • Web Services is client server application or application component which help, to establish communication between two devices over the network.
  • It is a software system for inter operable machine to machine communication.
  • It is collection of protocols foe exchanging information between two devices or application.
Type of Web Services
There are mainly Two types of Web Services.
  1. SOAP
  2. RESTful
Components of Web Services
There are Three types of web services.
  1. SOAP
  2. WSDL
  3. UDDI
SOAP
  • Soap stands for:- Simple Object Access Protocol.
  • It is a XML based protocol foe accessing web services.
  • It is XML based, so it is platform independent and language independent.
  • It can used with JAVA,.NET and PHP language on any plateform
WSDL
  • WSDL[Pronounced as:- wix-dull]:- Web Services Description Language.
  • It is a XML document contaning information about web services such as method name,parameter and how to access these.
  • It is a part of UDDI.
  • It acts as a interface between Web Services applications.
UDDI
  • UDDI | Universal description,Discovery and Integration.
  • It is XML based framework for describing with web Services.


Saturday, 30 July 2016

SQLite Database | Example to Add,Delete,Update and Get the data from SQLite Database.

SQLite is a opensource SQL database that stores data to a text file in the device. Android comes in with built in SQLite database implementation.

SQLite supports all the relational database features. In order to access this database, you don't need to establish any kind of connections for it like JDBC,ODBC e.t.c

Database - Package
The main package is android.database.sqlite that contains the classes to manage your own databases

Database - Creation
In order to create a database you just need to call this method openOrCreateDatabase with your database name and mode as a parameter. It returns an instance of SQLite database which you have to receive in your own object.Its syntax is given below


************************************Example****************************
Step1:- Open your Android Studio.
Step2:-Click on File >New >New Project > SQLiteExample
Step3:-Click on res>activity_main.xml and take 3 EditText 4 Button

design will be like below ...image...


Step3:- the coding of  activity_main.xml willl be like following...

<?xml version="1.0" encoding="utf-8"?>
<LinearLayout xmlns:android="http://schemas.android.com/apk/res/android"

    android:layout_width="match_parent"
    android:layout_height="match_parent"
    android:orientation="vertical">
    <EditText
        android:layout_width="match_parent"
        android:layout_height="45dp"
        android:id="@+id/edtId"
        android:hint="Enter Id"
        android:layout_marginTop="30dp"/>
    <EditText
        android:layout_width="match_parent"
        android:layout_height="45dp"
        android:id="@+id/edtName"
        android:hint="Enter Name"
        android:layout_marginTop="30dp"/>
    <EditText
        android:layout_width="match_parent"
        android:layout_height="45dp"
        android:id="@+id/edtPhone"
        android:hint="Enter Phone"
        android:layout_marginTop="30dp"/>
    <LinearLayout
        android:layout_width="match_parent"
        android:layout_height="wrap_content"
        android:orientation="horizontal"
        android:layout_marginTop="30dp">
        <Button
            android:layout_width="0dp"
            android:layout_height="wrap_content"
            android:layout_weight="1"
            android:text="Insert"
            android:id="@+id/btnInsert"
            android:background="#99C329"
            android:layout_marginLeft="10dp"/>
        <Button
            android:layout_width="0dp"
            android:layout_height="wrap_content"
            android:layout_weight="1"
            android:text="Delete"
            android:id="@+id/btnDelete"
            android:background="#99C329"
            android:layout_marginLeft="5dp"
            android:layout_marginRight="10dp"/>
    </LinearLayout>
    <LinearLayout
        android:layout_width="match_parent"
        android:layout_height="wrap_content"
        android:orientation="horizontal"
        android:layout_marginTop="20dp">
        <Button
            android:layout_width="0dp"
            android:layout_height="wrap_content"
            android:layout_weight="1"
            android:text="Update"
            android:id="@+id/btnUpdate"
            android:background="#99C329"
            android:layout_marginLeft="10dp"/>
        <Button
            android:layout_width="0dp"
            android:layout_height="wrap_content"
            android:layout_weight="1"
            android:text="Get"
            android:id="@+id/btnGet"
            android:background="#99C329"
            android:layout_marginLeft="5dp"
            android:layout_marginRight="10dp"/>
    </LinearLayout>


</LinearLayout>


Step4:-MainActivity.java code will be following....

package androidhubb.databaseexample;

import android.content.ContentValues;
import android.content.Context;
import android.database.Cursor;
import android.database.sqlite.SQLiteDatabase;
import android.support.v7.app.AppCompatActivity;
import android.os.Bundle;
import android.view.View;
import android.widget.Button;
import android.widget.EditText;
import android.widget.Toast;

public class MainActivity extends AppCompatActivity {
    EditText edtId,edtName,edtPhone;
    Button btnInsert,btnDelete,btnGet,btnUpdate;
    SQLiteDatabase db;

    @Override    
protected void onCreate(Bundle savedInstanceState) {
        super.onCreate(savedInstanceState);
        setContentView(R.layout.activity_main);

        //id..       
 edtId=(EditText)findViewById(R.id.edtId);
        edtName=(EditText)findViewById(R.id.edtName);
        edtPhone=(EditText)findViewById(R.id.edtPhone);
        //id        
btnInsert=(Button)findViewById(R.id.btnInsert);
        btnDelete=(Button)findViewById(R.id.btnDelete);
        btnUpdate=(Button)findViewById(R.id.btnUpdate);
        btnGet=(Button)findViewById(R.id.btnGet);

        //create database..        
db=openOrCreateDatabase("MyDatabase", Context.MODE_PRIVATE,null);

        //create table inside database..        
db.execSQL("create table if not exists student(ID integer PRIMARY KEY AUTOINCREMENT NOT NULL,NAME varchar(20),PHONE varchar(11))");


        //insert..        
btnInsert.setOnClickListener(new View.OnClickListener() {
            @Override            
public void onClick(View v) {
                ContentValues cv=new ContentValues();
                cv.put("ID",Integer.parseInt(edtId.getText().toString().trim()));
                cv.put("NAME",edtName.getText().toString().trim());
                cv.put("PHONE",edtPhone.getText().toString().trim());

                long i=db.insert("student",null,cv);
                if(i>0){
                    Toast.makeText(getApplicationContext(),"Data Inserted Successfully",Toast.LENGTH_LONG).show();
                }
                edtId.setText("");
                edtName.setText("");
                edtPhone.setText("");


            }
        });

        //delete...        
btnDelete.setOnClickListener(new View.OnClickListener() {
            @Override            
public void onClick(View v) {
                db.delete("student","ID=?",new String[]{edtId.getText().toString().trim()});
                edtId.setText("");
            }
        });

        //update..        
btnUpdate.setOnClickListener(new View.OnClickListener() {
            @Override            
public void onClick(View v) {
                ContentValues cv=new ContentValues();
                cv.put("ID",Integer.parseInt(edtId.getText().toString().trim()));
                cv.put("NAME",edtName.getText().toString().trim());
                cv.put("PHONE",edtPhone.getText().toString().trim());
                db.update("student",cv,"ID=?",new String[]{edtId.getText().toString().trim()});
                edtId.setText("");
                edtName.setText("");
                edtPhone.setText("");


            }
        });
        //get...        
btnGet.setOnClickListener(new View.OnClickListener() {
            @Override            
public void onClick(View v) {
                Cursor c=db.rawQuery("select * from student",null);
                while(c.moveToNext()){
                    Toast.makeText(getApplicationContext(),c.getInt(0)+"\n"+c.getString(1)+"\n"+c.getString(2),Toast.LENGTH_LONG).show();
                }
            }
        });


    }
}

Output Screen;---


Friday, 29 July 2016

Android Material Design:- Floating Labels Hint Text in EditText

Initially it acts as hint in EditText when the field is empty. When user start inputting the text, it starts animating by moving to floating label position.

Requirement:-Android Studio:-2.1.2
Note:- Right Click on app > Open Module Settings >Dependencies > click on "+" and add following
com.android.support:design:24.0.0


Step1:- Open your Android Studio.
Step2:-Click on File >New >New Project > EditTextFlotingHint
Step3:-Click on res>activity_main.xml and take 3 EditText 1 Button

Design will be like following....


Step4; open your activity_main.xml file and write following code....

<?xml version="1.0" encoding="utf-8"?>
<LinearLayout xmlns:android="http://schemas.android.com/apk/res/android"
    android:layout_width="match_parent"
    android:layout_height="match_parent"
    android:orientation="vertical"
    android:layout_margin="16dp"
    android:gravity="center_vertical">
<android.support.design.widget.TextInputLayout
    android:layout_width="match_parent"
    android:layout_height="wrap_content">
    <EditText
        android:layout_width="match_parent"
        android:layout_height="wrap_content"
        android:hint="Email"
        android:singleLine="true" />


</android.support.design.widget.TextInputLayout>
    <android.support.design.widget.TextInputLayout
        android:layout_width="match_parent"
        android:layout_height="wrap_content">
        <EditText
            android:layout_width="match_parent"
            android:layout_height="wrap_content"
            android:hint="Phone"
            android:inputType="number"
            android:singleLine="true" />
    </android.support.design.widget.TextInputLayout>

<android.support.design.widget.TextInputLayout
    android:layout_width="match_parent"
    android:layout_height="wrap_content">
    <EditText
        android:layout_width="match_parent"
        android:layout_height="wrap_content"
        android:hint="Password"
        android:singleLine="true"
        android:inputType="textPassword"/>
</android.support.design.widget.TextInputLayout>
    <Button
        android:layout_width="match_parent"
        android:layout_height="wrap_content"
        android:text="SignUp"/>
</LinearLayout>


Output :-

SharedPreference | How to use to store and get data.


  • It used to store and retrieve primitive information in the string,integer,long etc.
  • Android Shared preferences are used to store data in key and value pair so that we can retrieve the value on the basis of key.
  • It is widely used to get information from user such as in settings,profile update,save login ID and password.
  • It store only one data at a time.
  • If we store new data than previously data went to delete automatically.
  • In order to use shared preferences,we have to call a method getSharedPreferences() that returns a SharedPreference instance .
Requirement:-
Android Studio:-2.1.2

Step1:- Open your Android Studio.
Step2:-Click on File >New >New Project > SharedPreferenceTest
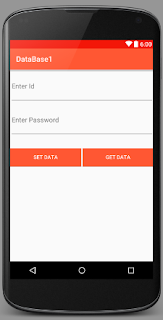
Step3:-Click on res>activity_main.xml and take 2 EditText and 2 Button as like below image.


Step4:- coding of  activity_main.xml will be like following....

<?xml version="1.0" encoding="utf-8"?>
<LinearLayout
    xmlns:android="http://schemas.android.com/apk/res/android"
    xmlns:tools="http://schemas.android.com/tools"
    android:layout_width="match_parent"
    android:layout_height="match_parent"
    android:orientation="vertical">

    <EditText
        android:layout_width="match_parent"
        android:layout_height="90dp"
        android:hint="Enter Id"
        android:id="@+id/txtId"/>
    <EditText
        android:layout_width="match_parent"
        android:layout_height="90dp"
        android:hint="Enter Password"
        android:id="@+id/txtPassqword"
        android:inputType="textPassword"/>
    <LinearLayout
        android:layout_width="match_parent"
        android:layout_height="wrap_content"
        android:orientation="horizontal"
        android:layout_marginTop="30dp">
        <Button
            android:layout_width="0dp"
            android:layout_height="wrap_content"
            android:layout_weight="1"
            android:text="Set Data"
            android:id="@+id/btnSet"
            android:background="#FF5733"
            android:textColor="#ffffff"/>
        <Button
            android:layout_width="0dp"
            android:layout_height="wrap_content"
            android:layout_weight="1"
            android:text="Get Data"
            android:id="@+id/btnGet"
            android:background="#FF5733"
            android:layout_marginLeft="4dp"
            android:textColor="#ffffff"/>
    </LinearLayout>
</LinearLayout>

Step5:- Now Open MainActivity.java and write following code..

package supriya.sharedpreferencetest;

import android.content.Context;
import android.content.SharedPreferences;
import android.support.v7.app.AppCompatActivity;
import android.os.Bundle;
import android.view.View;
import android.widget.Button;
import android.widget.EditText;
import android.widget.Toast;

public class MainActivity extends AppCompatActivity {

    //create object of Edittext and button..    EditText txtId,txtPass;
    Button btnSetData,btnGetData;

    @Override    protected void onCreate(Bundle savedInstanceState) {
        super.onCreate(savedInstanceState);
        setContentView(R.layout.activity_main);

        //find id ..        txtId=(EditText)findViewById(R.id.txtId);
        txtPass=(EditText)findViewById(R.id.txtPassqword);
        btnSetData=(Button)findViewById(R.id.btnSet);
        btnGetData=(Button)findViewById(R.id.btnGet);

        //click listner of setdata button
        btnSetData.setOnClickListener(new View.OnClickListener() {
            @Override            public void onClick(View v) {
                //first we have to create database...                
SharedPreferences spf=getSharedPreferences("MyDatabase", Context.MODE_PRIVATE);

                //By usin editor class of SharedPreferences we can edit the data base... 
               SharedPreferences.Editor editDatabase=spf.edit();

                //set ID in to the database..we are using id as a integer type 
               editDatabase.putInt("ID",Integer.parseInt(txtId.getText().toString().trim()));

                //set Password..we r using password as String type.... 
               editDatabase.putString("PASSWORD",txtPass.getText().toString().trim());

                //save all changes into database.. 
               editDatabase.commit();
//make empty editbox....
               txtId.setText("");
               txtPass.setText("");
            }
        });


        //get button coding....       
 btnGetData.setOnClickListener(new View.OnClickListener() {
            @Override            
public void onClick(View v) {
                //again create object of SharedPreferences and database.. as like above 
               SharedPreferences spf=getSharedPreferences("MyDatabase",Context.MODE_PRIVATE);

                //here we getint password into integer variable i of key value ID 
               int i=spf.getInt("ID",0);
                String str=spf.getString("PASSWORD","No Data");
                Toast.makeText(getApplicationContext(),"Id:-"+i+"\n"+"Password:-"+str+"\n",Toast.LENGTH_LONG).show();
            }
        });
    }
}

Step6: Run the program and Output will be like following..