Monday, 26 February 2018

How to change in millisecond time to Date | Find difference between current date , future date and past date

Hii This tutorial is for how to change millisecond time to Date and also how to code a coupon Expiry and Expired date ....
Here is some   steps to do this example:-
Step 1:- Add new project Open android studio go File - New- New project.. now open activity_main.xml and write following code:-
<?xml version="1.0" encoding="utf-8"?>
<LinearLayout xmlns:android="http://schemas.android.com/apk/res/android"    
xmlns:tools="http://schemas.android.com/tools"    
android:layout_width="match_parent"    
android:layout_height="match_parent"    
android:orientation="vertical"    
tools:context="com.example.supriyabharti.radiobuttonexmp.MainActivity">

<TextView        
android:layout_width="match_parent"        
android:layout_height="wrap_content"        
android:layout_margin="20dp"        
android:gravity="center"        
android:text="Find Date Day difference Example" />

<RadioGroup        
android:id="@+id/radioGroup"        
android:layout_width="match_parent"        
android:layout_height="wrap_content"        
android:weightSum="2"        
android:orientation="horizontal">
 <RadioButton           
 android:layout_width="wrap_content"           
android:layout_height="wrap_content"            
android:text="1518064675994"           
android:layout_weight="1"            
android:id="@+id/pastDate"/>
 <RadioButton            
android:layout_width="wrap_content"           
android:layout_height="wrap_content"            
android:text="1545676200000"            
android:layout_weight="1"            
android:id="@+id/futureDate"/>
    </RadioGroup>

<View        
android:layout_width="match_parent"        
android:layout_height="2dp"        
android:layout_marginTop="30dp"        
android:background="@color/inactive"/>
<LinearLayout        
android:layout_width="match_parent"        
android:layout_height="100dp"        
android:layout_margin="30dp"        
android:layout_marginTop="30dp"        
android:orientation="vertical">
<TextView            
android:layout_width="match_parent"            
android:layout_height="wrap_content"            
android:text="Fashion Coupon"            
android:textStyle="bold"            
android:gravity="center"/>
<TextView            
android:id="@+id/expireDate"            
android:layout_width="match_parent"            
android:layout_height="wrap_content"           
 android:text="Expire on"            
android:gravity="center"/>
<TextView            
android:id="@+id/expireDayLeft"            
android:layout_width="match_parent"            
android:layout_height="wrap_content"           
 android:text="Day Left"            
android:gravity="center"/>
    </LinearLayout>

</LinearLayout>
Step 2:-Open MainActivity.java class  and write following code:-
public class MainActivity extends AppCompatActivity {
    RadioButton pastDate,futureDate;
    RadioGroup radioGroup;
    TextView expireDate,expireDayLeft;

    @Override
    protected void onCreate(Bundle savedInstanceState) {
        super.onCreate(savedInstanceState);
        setContentView(R.layout.activity_main);
        pastDate=(RadioButton)findViewById(R.id.pastDate);
        futureDate=(RadioButton)findViewById(R.id.futureDate);
        radioGroup=(RadioGroup) findViewById(R.id.radioGroup);
        expireDate=(TextView) findViewById(R.id.expireDate);
        expireDayLeft=(TextView) findViewById(R.id.expireDayLeft);

        radioGroup.setOnCheckedChangeListener(new RadioGroup.OnCheckedChangeListener() {
            @Override
            public void onCheckedChanged(RadioGroup group, int checkedId) {
                switch (checkedId){
                    case R.id.pastDate:
                        long selectedDate=Long.parseLong(pastDate.getText().toString());
                        SetDataToView(selectedDate);
                        break;
                    case R.id.futureDate:
                        selectedDate=Long.parseLong(futureDate.getText().toString());
                        SetDataToView(selectedDate);
                        break;
                }
            }
        });
    }
    //method to change ui according to selection    
        public void SetDataToView(long selectedBtnId){
        long dateInMiliSecond=selectedBtnId;
        Date date1=new Date(dateInMiliSecond);
        Date date2=new Date(System.currentTimeMillis());
        long diffInDays=date1.getTime() - date2.getTime();
        int days = (int) Math.abs(TimeUnit.DAYS.convert(diffInDays, TimeUnit.MILLISECONDS));

        SimpleDateFormat simpleDateFormat=new SimpleDateFormat(" d "+"MMMM "+"yyyy");
        if(dateInMiliSecond>=System.currentTimeMillis()){
            expireDayLeft.setVisibility(View.VISIBLE);
            expireDate.setText("Expires on"+simpleDateFormat.format(dateInMiliSecond));
            expireDate.setTextColor(getResources().getColor(R.color.green));
            expireDayLeft.setText(days+" "+"days left");
            expireDayLeft.setTextColor(getResources().getColor(R.color.green));

        }else if(dateInMiliSecond< System.currentTimeMillis()){
            expireDate.setText("Expired on"+simpleDateFormat.format(dateInMiliSecond));
            expireDate.setTextColor(getResources().getColor(R.color.red));
            expireDayLeft.setVisibility(View.GONE);
        }

    }
}
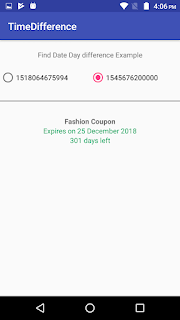
Step 3:-Screen Shots are following:-


Friday, 23 February 2018

How to use RadioButton in android, How to set image and text dynamically on radio group, how to set text on radio using method, OnClickListener on RadioButton

Here i am giving one simple example that how to use radio button in android, OnClickListener on RadioButton | Dynamically set image and text to a radioGroup radioButton | How to set text on radio button by using method in android. Here are the following steps to do this:-

Step 1:- Add new project and open activity_main.xml file and write following code:-
<?xml version="1.0" encoding="utf-8"?>
<LinearLayout xmlns:android="http://schemas.android.com/apk/res/android"    
xmlns:tools="http://schemas.android.com/tools"    
android:layout_width="match_parent"    
android:layout_height="match_parent"    
android:orientation="vertical"    
tools:context="com.example.supriyabharti.radiobuttonexmp.MainActivity">

    <TextView        
android:layout_width="match_parent"        
android:layout_height="wrap_content"        
android:layout_margin="20dp"        
android:gravity="center"        
android:text="Radio Group Example" />

    <RadioGroup        
android:id="@+id/radioGroup"        
android:layout_width="match_parent"        
android:layout_height="30dp"      
  android:orientation="horizontal"      
  android:weightSum="2">

        <RadioButton           
 android:id="@+id/radioChat"           
 android:layout_width="0dp"           
 android:layout_height="30dp"          
  android:layout_marginLeft="20dp"          
  android:layout_weight="1"           
 android:button="@null"            
android:drawableLeft="@mipmap/chatgrey"      
      android:drawablePadding="10dp"           
 android:text="Chat" />

        <RadioButton           
 android:id="@+id/radioVideo"          
  android:layout_width="0dp"           
 android:layout_height="30dp"            
android:layout_weight="1"            
android:button="@null"            
android:drawableLeft="@mipmap/videogrey"            
android:drawablePadding="10dp"            
android:text="video" />
    </RadioGroup>

    <Button        
android:id="@+id/button"        
android:layout_width="wrap_content"        
android:layout_height="wrap_content"        
android:layout_gravity="center"       
 android:layout_marginTop="30dp"       
 android:background="@color/green"       
 android:padding="10dp"        
android:text="Set text using method" />

</LinearLayout>
Step 2:- colors.xml
<?xml version="1.0" encoding="utf-8"?><resources>
    <color name="green">#FF00AA64</color>
    <color name="inactive">#FF808A8F</color>
</resources>
Step 3:- MainActivity.java:-
public class MainActivity extends AppCompatActivity {
    RadioButton video,Chat;
    Button button;


    @Override    
        protected void onCreate(Bundle savedInstanceState) {
        super.onCreate(savedInstanceState);
        setContentView(R.layout.activity_main);
        video=(RadioButton)findViewById(R.id.radioVideo);
        Chat=(RadioButton)findViewById(R.id.radioChat);
        button=(Button)findViewById(R.id.button);

        //initially chat button will be activated so dynamically we will give activated image and color to the button        
        Chat.setCompoundDrawablesRelativeWithIntrinsicBounds(R.mipmap.chat_green,0,0,0);
        Chat.setText("ChatNow");
        Chat.setTextColor(getResources().getColor(R.color.green));
        Chat.setOnClickListener(new View.OnClickListener() {
            @Override            
                public void onClick(View v) {
                Chat.setCompoundDrawablesRelativeWithIntrinsicBounds(R.mipmap.chat_green,0,0,0);
                Chat.setText("ChatNow");
                Chat.setTextColor(getResources().getColor(R.color.green));

                //set inactive to other button..                
                video.setCompoundDrawablesRelativeWithIntrinsicBounds(R.mipmap.videogrey,0,0,0);
                video.setTextColor(getResources().getColor(R.color.inactive));
                video.setText("Video");
            }
        });

        //video click...        
           video.setOnClickListener(new View.OnClickListener() {
            @Override            
                public void onClick(View v) {
                video.setCompoundDrawablesRelativeWithIntrinsicBounds(R.mipmap.video_green,0,0,0);
                video.setText("VideoNow");
                video.setTextColor(getResources().getColor(R.color.green));

                //set remaning to inactive..                
                Chat.setCompoundDrawablesRelativeWithIntrinsicBounds(R.mipmap.chatgrey,0,0,0);
                Chat.setText("Chat");
                Chat.setTextColor(getResources().getColor(R.color.inactive));
            }
        });

        //button click listner...        
         button.setOnClickListener(new View.OnClickListener() {
            @Override            
                public void onClick(View v) {
                setText(getResources().getString(R.string.Rs)+"250","",Chat);
                setText(getResources().getString(R.string.Rs)+"350","",video);
            }
        });

    }

    //method to set text on radio button..    
private void setText(String text, String defaultText, View view) {
        if (view instanceof TextView) {
            TextView textView = (TextView) view;
            if (text != null && !text.isEmpty()) {
                textView.setText(text);
            } else {
                textView.setText(defaultText);
            }
        }
    }
}
Step 4:- string.xml:-
<resources>
    <string name="app_name">RadioButtonExmp</string>
    <string name="Rs">\u20B9</string>
</resources>
Step 5: ScreenShorts:-


Wednesday, 14 February 2018

RecyclerView Example with click on every row and view data in another class.

1. ModelClass:-
public class ModelClass {
    int image;
    String name,number;

    public ModelClass(int image, String name, String number) {
        this.image = image;
        this.name = name;
        this.number = number;
    }

    public int getImage() {
        return image;
    }

    public void setImage(int image) {
        this.image = image;
    }

    public String getName() {
        return name;
    }

    public void setName(String name) {
        this.name = name;
    }

    public String getNumber() {
        return number;
    }

    public void setNumber(String number) {
        this.number = number;
    }
}
2.AdapterClass.java
public class AdapterClass extends RecyclerView.Adapter<AdapterClass.MyViewHolder> {
    MainActivity mainActivity;
    ArrayList<ModelClass> modelClassArrayList;

    public AdapterClass(MainActivity mainActivity, ArrayList<ModelClass> modelClassArrayList) {
        this.mainActivity = mainActivity;
        this.modelClassArrayList = modelClassArrayList;
    }

    @Override   
 public AdapterClass.MyViewHolder onCreateViewHolder(ViewGroup parent, int viewType) {
        View view= LayoutInflater.from(parent.getContext()).inflate(R.layout.row_item,parent,false);
        MyViewHolder viewHolder=new MyViewHolder(view,modelClassArrayList,mainActivity);
        return viewHolder;
    }

    @Override    
public void onBindViewHolder(AdapterClass.MyViewHolder holder, int position) {
        holder.image.setImageResource(modelClassArrayList.get(position).getImage());
        holder.name.setText(modelClassArrayList.get(position).getName());
        holder.phone.setText(modelClassArrayList.get(position).getNumber());
    }

    @Override    
public int getItemCount() {
        return modelClassArrayList.size();
    }

    //another class...    
public class MyViewHolder extends RecyclerView.ViewHolder implements View.OnClickListener{
        ImageView image;
        TextView name,phone;
        ArrayList<ModelClass> modelClasses;
        MainActivity mainActivity;

        public MyViewHolder(View itemView,ArrayList<ModelClass> list,MainActivity mainActivity) {
            super(itemView);
            this.modelClasses=list;
            this.mainActivity=mainActivity;
            itemView.setOnClickListener(this);
            image=(ImageView)itemView.findViewById(R.id.image);
            name=(TextView)itemView.findViewById(R.id.name);
            phone=(TextView)itemView.findViewById(R.id.number);

        }

        @Override        
public void onClick(View v) {
            int position=getAdapterPosition();
            ModelClass modelClass=this.modelClasses.get(position);
            Intent intent=new Intent(mainActivity,DetailsClass.class);
            intent.putExtra("image",modelClass.getImage());
            intent.putExtra("name",modelClass.getName());
            intent.putExtra("phone",modelClass.getNumber());
            this.mainActivity.startActivity(intent);
        }
    }
}
3.row_item.xml
<?xml version="1.0" encoding="utf-8"?>
<LinearLayout    xmlns:android="http://schemas.android.com/apk/res/android"    
android:layout_width="match_parent"    
android:orientation="horizontal"    
android:layout_margin="20dp"    
android:gravity="center"    
android:layout_height="wrap_content">
    <ImageView        
android:layout_width="70dp"        
android:layout_height="70dp"        
android:layout_weight="1"        
android:id="@+id/image"/>
    <TextView        
android:layout_width="wrap_content"        
android:layout_height="wrap_content"        
android:layout_weight="1"        
android:id="@+id/name"/>
    <TextView        android:layout_width="wrap_content"        
android:layout_height="wrap_content"        
android:layout_weight="1"        
android:id="@+id/number"/>

</LinearLayout>
2.activity_main.xml
<?xml version="1.0" encoding="utf-8"?>
<LinearLayout xmlns:android="http://schemas.android.com/apk/res/android"    
xmlns:app="http://schemas.android.com/apk/res-auto"    
xmlns:tools="http://schemas.android.com/tools"    
android:layout_width="match_parent"    
android:layout_height="match_parent"    
tools:context="com.example.supriyabharti.recylerviewclickitem.MainActivity">

    <android.support.v7.widget.RecyclerView        
android:layout_width="match_parent"        
android:layout_height="match_parent"        
android:id="@+id/recycler">
</android.support.v7.widget.RecyclerView>

</LinearLayout>
4.MainActivity.java
public class MainActivity extends AppCompatActivity {
    private RecyclerView recycler;
    RecyclerView.LayoutManager manager;
    AdapterClass adapterClass;
    int[] imageList={R.mipmap.ic_launcher,R.mipmap.ic_launcher,R.mipmap.ic_launcher,R.mipmap.ic_launcher,R.mipmap.ic_launcher,R.mipmap.ic_launcher};
    String[] strName={"Supriya","Navin","Ankit","Saurabh","Pankaj","Pappu"};
    String[] strPhone={"+91333222","91333222","91333222","91333222","91333222","91333222"};
    ArrayList<ModelClass> list=new ArrayList<ModelClass>();
    ModelClass modelClass;

    @Override    
protected void onCreate(Bundle savedInstanceState) {
        super.onCreate(savedInstanceState);
        setContentView(R.layout.activity_main);
        recycler=(RecyclerView)findViewById(R.id.recycler);

        int i=0;
        for(String s:strName){
            modelClass =new ModelClass(imageList[i],strName[i],strPhone[i]);
            list.add(modelClass);
            i++;
        }

        manager=new LinearLayoutManager(this);
        adapterClass=new AdapterClass(MainActivity.this,list);
        recycler.setHasFixedSize(true);
        recycler.setLayoutManager(manager);
        recycler.setAdapter(adapterClass);

    }
}
5.DetailClass.java

public class DetailsClass extends AppCompatActivity {
    ImageView imageView;
    TextView name,number;
    @Override    
protected void onCreate(@Nullable Bundle savedInstanceState) {
        super.onCreate(savedInstanceState);
        setContentView(R.layout.details);
        imageView=(ImageView)findViewById(R.id.image);
        name=(TextView) findViewById(R.id.name);
        number=(TextView) findViewById(R.id.number);
               
imageView.setImageResource(getIntent().getIntExtra("image",1));
        name.setText(getIntent().getStringExtra("name"));
        number.setText(getIntent().getStringExtra("phone"));
    }
}
6.details.xml
<?xml version="1.0" encoding="utf-8"?>
<LinearLayout xmlns:android="http://schemas.android.com/apk/res/android"    
android:orientation="vertical"    
android:layout_width="match_parent"    
android:gravity="center"    
android:layout_height="match_parent">
    <ImageView        
android:layout_width="70dp"        
android:layout_height="70dp"        
android:id="@+id/image"/>
    <TextView       
 android:layout_width="wrap_content"        
android:layout_height="wrap_content"        
android:id="@+id/name"/>
    <TextView        
android:layout_width="wrap_content"        
android:layout_height="wrap_content"        
android:id="@+id/number"/>

</LinearLayout>
7.screenShots:


Tuesday, 13 February 2018

RecyclerView Example | How to use RecyclerView to show the data using Model Class in Android

Hii All.. this example is how to use RecyclerView in android studio.Here we will use Model class with setter and getter of all inputs. For this create new Project.

Step 1:-Create a model class inside your package where MainActivity class is there.Here we will show image,name and phone number.So model will be like following :-
public class ModelClass {
    int image;
    String name;
    String phpneNo;
    public ModelClass(int image, String name, String phpneNo) {
        this.image = image;
        this.name = name;
        this.phpneNo = phpneNo;
    }

    public int getImage() {
        return image;
    }

    public void setImage(int image) {
        this.image = image;
    }

    public String getName() {
        return name;
    }

    public void setName(String name) {
        this.name = name;
    }

    public String getPhpneNo() {
        return phpneNo;
    }

    public void setPhpneNo(String phpneNo) {
        this.phpneNo = phpneNo;
    }
}
Step 2:-Create another Adapter class to add each row with data.
public class AdapterClass extends RecyclerView.Adapter<AdapterClass.MyViewolder> {
    ArrayList<ModelClass> modelClassList;
    MainActivity mainActivity;

    public AdapterClass(ArrayList<ModelClass> modelClassList, MainActivity mainActivity) {
        this.modelClassList = modelClassList;
        this.mainActivity = mainActivity;
    }

    //this is for adding view..    
@Override    
public AdapterClass.MyViewolder onCreateViewHolder(ViewGroup parent, int viewType) {
        View view= LayoutInflater.from(parent.getContext()).inflate(R.layout.row_item,parent,false);
        MyViewolder viewolder=new MyViewolder(mainActivity,modelClassList,view);
        return viewolder;
    }

    @Override    
public void onBindViewHolder(AdapterClass.MyViewolder holder, int position) {
        ModelClass modelClass=modelClassList.get(position);
        holder.img.setImageResource(modelClass.getImage());
        holder.name.setText(modelClass.getName());
        holder.phone.setText(modelClass.getPhpneNo());

    }

    @Override    
public int getItemCount() {
        return modelClassList.size();
    }

    //class for view holding the view..
    public class MyViewolder extends RecyclerView.ViewHolder{
        ImageView img;
        TextView name,phone;
        ArrayList<ModelClass> list;
        Context c;

        public MyViewolder(Context ctx,ArrayList<ModelClass> list,View itemView) {
            super(itemView);
            this.list=list;
            this.c=ctx;
            img=(ImageView)itemView.findViewById(R.id.image);
            name=(TextView)itemView.findViewById(R.id.name);
            phone=(TextView)itemView.findViewById(R.id.phone);

        }
    }
}
Step 3-row_item.xml :-
<?xml version="1.0" encoding="utf-8"?>
<LinearLayout xmlns:android="http://schemas.android.com/apk/res/android"    
android:layout_width="match_parent"    
android:layout_height="wrap_content"    
android:orientation="vertical">

    <LinearLayout        
android:layout_width="match_parent"        
android:layout_height="wrap_content"        
android:orientation="horizontal"        
android:weightSum="2">

        <ImageView            
android:id="@+id/image"            
android:layout_width="50dp"            
android:layout_height="70dp"            
android:layout_weight="1"            
android:paddingRight="20dp" />

        <LinearLayout            
android:layout_width="wrap_content"            
android:layout_height="wrap_content"            
android:layout_weight="1"            
android:layout_gravity="center"            
android:orientation="vertical">

            <TextView                
android:id="@+id/name"                
android:layout_width="wrap_content"                
android:layout_height="wrap_content"                
android:text="Name" />

            <TextView                
android:id="@+id/phone"                
android:layout_width="wrap_content"                
android:layout_height="wrap_content"                
android:text="+9876567" />
        </LinearLayout>
    </LinearLayout>
    <View       
 android:layout_width="match_parent"        
android:layout_height="1dp"        
android:background="@color/colorPrimaryDark"></View>

</LinearLayout>
Step 4:- main_activity.xml:-
<?xml version="1.0" encoding="utf-8"?>
<LinearLayout xmlns:android="http://schemas.android.com/apk/res/android"    
xmlns:tools="http://schemas.android.com/tools"    
android:layout_width="match_parent"   
 android:layout_height="match_parent"    
android:orientation="vertical">
<android.support.v7.widget.RecyclerView    
android:layout_width="match_parent"    
android:layout_height="match_parent"   
 android:id="@+id/recycler"></android.support.v7.widget.RecyclerView>
</LinearLayout>
Step 5:-MainActivity.java:-
public class MainActivity extends AppCompatActivity {
    RecyclerView mRrecycler;
    int[] imageStr={R.mipmap.ic_launcher,R.mipmap.ic_launcher,R.mipmap.ic_launcher,R.mipmap.ic_launcher,R.mipmap.ic_launcher,R.mipmap.ic_launcher,R.mipmap.ic_launcher};
    String[] strName={"Supriya","Navin","Saurabh","Ankit","manju","Rahul","Radha"};
    String[] strNumber={"+91111111","+911111112","+911111113","+911111114","+911111115","+911111116","+91111117"};
    ArrayList<ModelClass> arrayList=new ArrayList<ModelClass>();
    RecyclerView.LayoutManager manager;
    AdapterClass adapterClass;

    @Override    
protected void onCreate(Bundle savedInstanceState) {
        super.onCreate(savedInstanceState);
        setContentView(R.layout.activity_main);
        mRrecycler=(RecyclerView)findViewById(R.id.recycler);

        //add data to the model class.        
int i=0;
        for(String s:strName){
            ModelClass modelClass=new ModelClass(imageStr[i],strName[i],strNumber[i]);
            arrayList.add(modelClass);
            i++;
        }
        manager=new LinearLayoutManager(this);
        mRrecycler.setLayoutManager(manager);
        adapterClass=new AdapterClass(arrayList,this);
        mRrecycler.setAdapter(adapterClass);
        mRrecycler.setHasFixedSize(true);
    }
}
Step 6:- Screen Shorts:-